
Комментарии
Holiday DIY: Mason Jar Forced Bulbs and Evergreen Gift Tags
Learn how to make these winter projects from the book ‘Garden Made’ by Stephanie Rose
Anne Colby
15 декабря, 2017
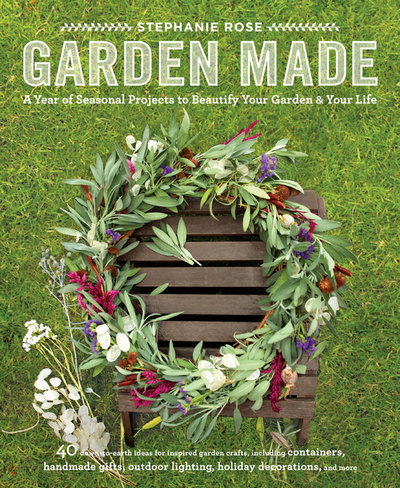
Stephanie Rose started gardening to help pass the time while recovering from a debilitating yearlong illness. She soon caught the gardening bug, and today she is a master gardener in Vancouver, where she teaches organic gardening, food growing and garden crafts and produces her Garden Therapy blog. Rose has written a book, Garden Made: A Year of Seasonal Projects to Beautify Your Garden and Your Life (Roost Books, 2015), which features more than 40 DIY projects, including homemade paper, candles, wreaths and planters.
She aims to inspire as well as be accessible, writing of her projects: “They are meant to sweep you away, allow you to dive in to a sensory experience that engages your body and mind, and leave you with something beautiful to enjoy in your home or garden.” We offer two of them, Mason jar forced bulbs and evergreen gift tags, below.
She aims to inspire as well as be accessible, writing of her projects: “They are meant to sweep you away, allow you to dive in to a sensory experience that engages your body and mind, and leave you with something beautiful to enjoy in your home or garden.” We offer two of them, Mason jar forced bulbs and evergreen gift tags, below.
Photos and text by Stephanie Rose
Bulb forcing has been a gardener’s pastime since the 1800s. If you are an antiques hunter, you may have seen hyacinth glasses or forcing vases: pinched-neck glass vases with wide bottoms. Perhaps you have seen more current displays of fragrant paperwhites set in soil at a florist shop. The hobby’s longevity is understandable when you come to appreciate that spring’s fragrant blooms can be grown right on your windowsill, in the fall!
Bulb forcing has been a gardener’s pastime since the 1800s. If you are an antiques hunter, you may have seen hyacinth glasses or forcing vases: pinched-neck glass vases with wide bottoms. Perhaps you have seen more current displays of fragrant paperwhites set in soil at a florist shop. The hobby’s longevity is understandable when you come to appreciate that spring’s fragrant blooms can be grown right on your windowsill, in the fall!
Mason Jar Forced Bulbs
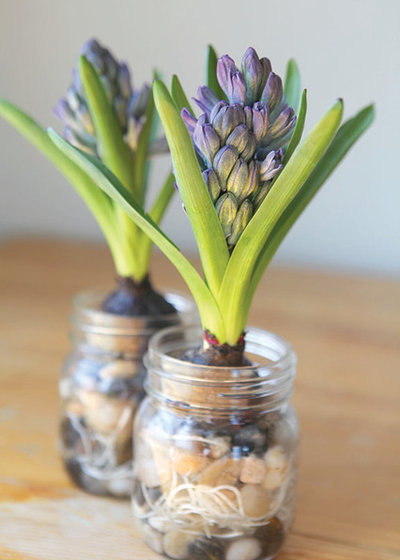
Forced bulbs provide a fresh, long-lasting display of bright green leaves atop a growing bulb that is decorative enough in its own right, even before the flowers appear. Here are three different ways to create gorgeous Mason jar forced bulbs: in soil, in pebbles and in water.
Forced bulbs provide a fresh, long-lasting display of bright green leaves atop a growing bulb that is decorative enough in its own right, even before the flowers appear. Here are three different ways to create gorgeous Mason jar forced bulbs: in soil, in pebbles and in water.
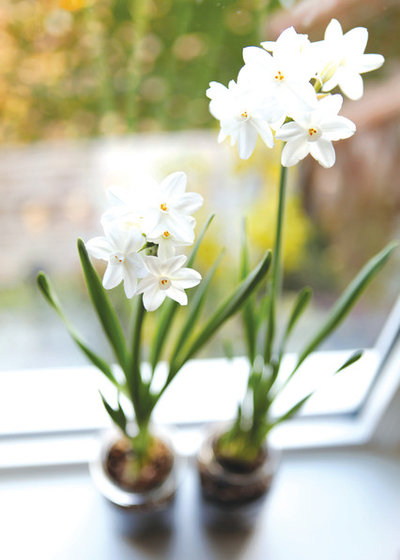
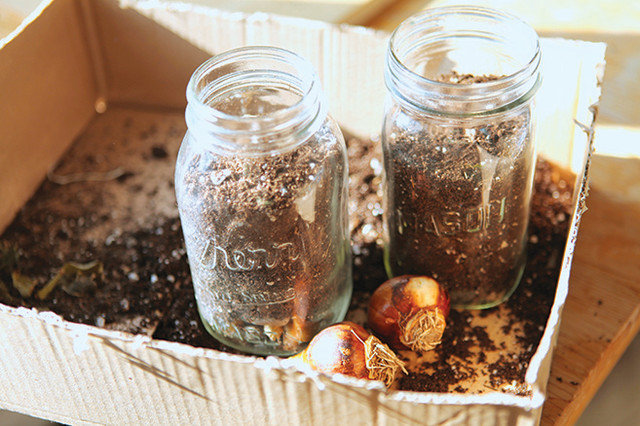
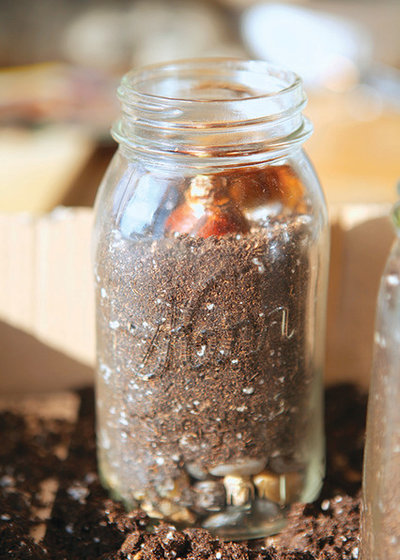
Forcing Bulbs in Soil
- Quart-size or larger Mason jar
- Clean ½-inch-diameter stones
- Indoor potting soil mix
- Paperwhite bulbs
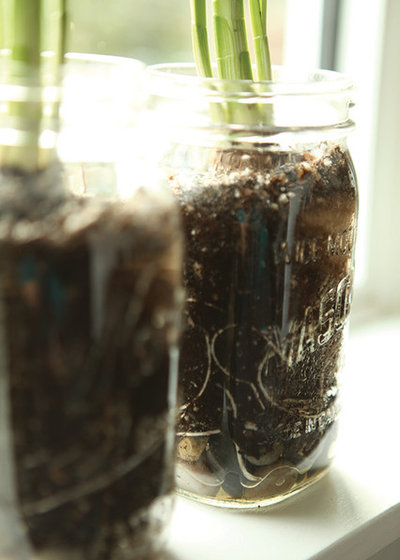
1. Planting bulbs in soil is the most obvious choice and makes for a stable base for tall flowers like paperwhites. Start with a clean Mason jar and line the bottom with an inch of half-inch-diameter stones. Top the stones with a few inches of soil and set a bulb in so that the neck is above the soil line. Pack soil around the bulb and press firmly in place.
2. Keep an eye on the roots: They should be white and long, winding through the soil in the jar. Being able to see below the surface adds to the charm of the container, and it makes a great learning project for kids.
2. Keep an eye on the roots: They should be white and long, winding through the soil in the jar. Being able to see below the surface adds to the charm of the container, and it makes a great learning project for kids.
Unlike plant pots, Mason jars don’t have drainage holes. They do have front-row viewing to the root system, though, so monitoring watering is quite simple. Water to moisten the soil but not so much that there is standing water at the bottom of the jar. If you add too much water, you can always pour it back out.
3. After blooming, keep the greens watered until the soil warms up enough to plant them in the spring garden. They are not likely to bloom again during the current season, but if they naturalize you will get to enjoy them in many a spring to come.
3. After blooming, keep the greens watered until the soil warms up enough to plant them in the spring garden. They are not likely to bloom again during the current season, but if they naturalize you will get to enjoy them in many a spring to come.
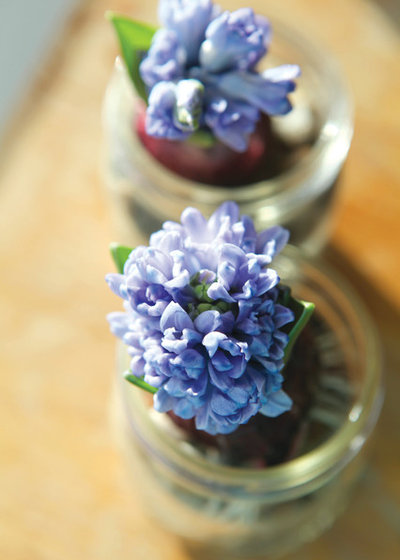
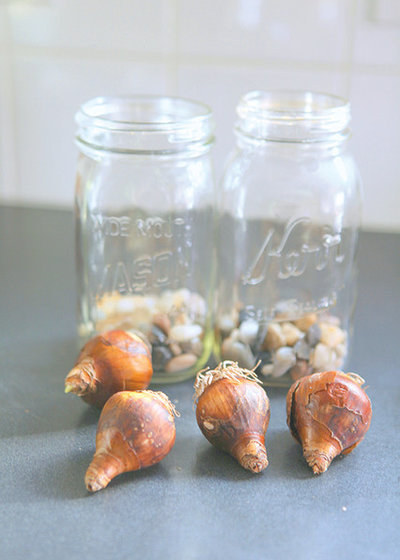
Forcing Bulbs in Pebbles
- Wide, pint-sized Mason jar with a regular-size mouth
- Clean ½-inch-diameter stones
- Prechilled hyacinth bulbs (Hyacinth ‘Delft Blue’ shown)
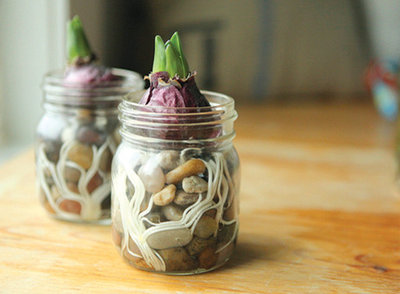
Fill the jar to just an inch below the neck with clean stones, glass beads or decorative marbles. Nestle the bulb on the top of the stones, using a few extras to secure the bulb in place. Add water to just half an inch below the surface.
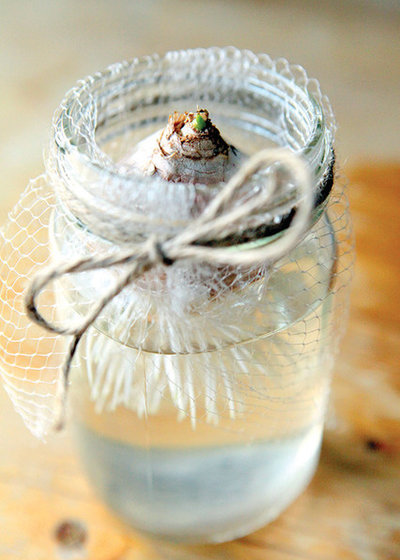
Forcing Bulbs in Water
- Wide, pint-sized Mason jar with a regular-sized mouth
- Plastic mesh
- Garden twine
- Prechilled hyacinth bulbs (Hyacinth ‘L’Innocence’ shown)
2. Use the bulb to measure how deep the hammock should be, then secure it by folding the edges over the mouth of the jar and tying a length of garden twine around the mesh.
3. Fill with water to one-quarter of an inch from the bulb bottom. The roots will quickly find and reach the water.
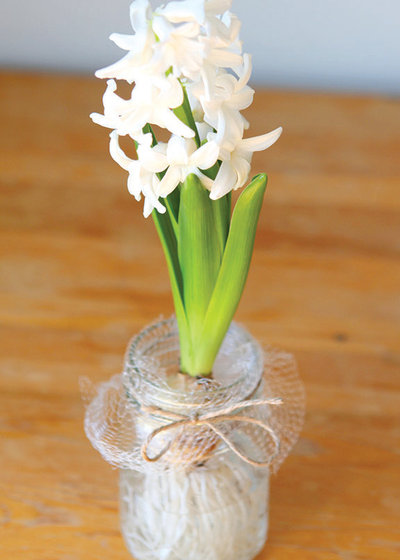
Forced-Bulb Care
Once the bulbs are planted, set them in a room where there is ample indirect light and a temperature of around 60 degrees Fahrenheit. Add clean water as needed.
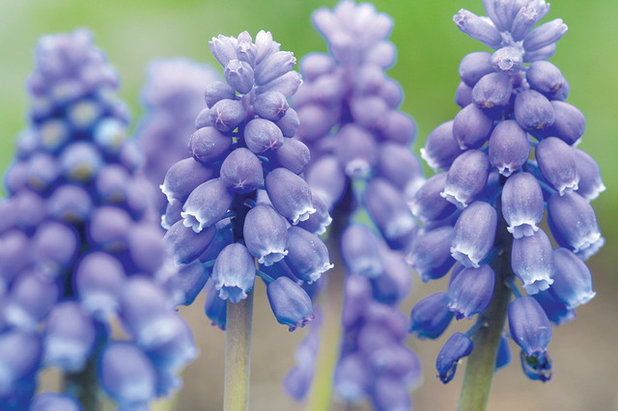
Weeks to Bloom
Hyacinth, crocus and Muscari species (grape hyacinth), pictured below, take two to three weeks to bloom. Paperwhites take three to five weeks to bloom; amaryllis bulbs vary by species.
3. Fill with water to one-quarter of an inch from the bulb bottom. The roots will quickly find and reach the water.
Forced-Bulb Care
Once the bulbs are planted, set them in a room where there is ample indirect light and a temperature of around 60 degrees Fahrenheit. Add clean water as needed.
Weeks to Bloom
Hyacinth, crocus and Muscari species (grape hyacinth), pictured below, take two to three weeks to bloom. Paperwhites take three to five weeks to bloom; amaryllis bulbs vary by species.
Prechilling Bulbs
To force most bulbs indoors, they need to be prechilled, with the exceptions of amaryllis and paperwhite bulbs. The best bet is to buy prechilled bulbs at the garden center.
One way to chill bulbs is in the fridge inside a paper bag. Just be sure to keep the bag in a crisper drawer away from any other food. The idea is to trick the bulbs into starting their spring growth by faking winter. Note that each type of bulb will have a different number of weeks required for chilling. Hyacinth bulbs need one to 12 weeks of chilling. Crocus and Muscari species (grape hyacinth) need 14 to 15 weeks.
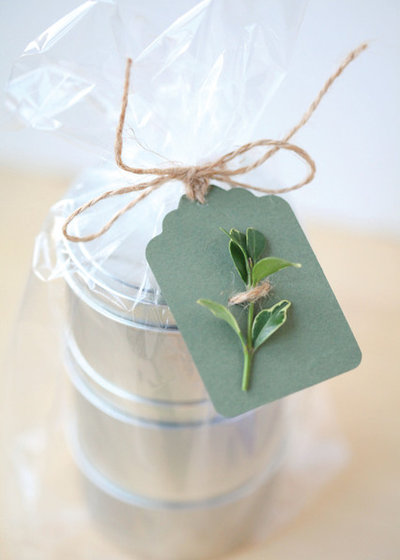
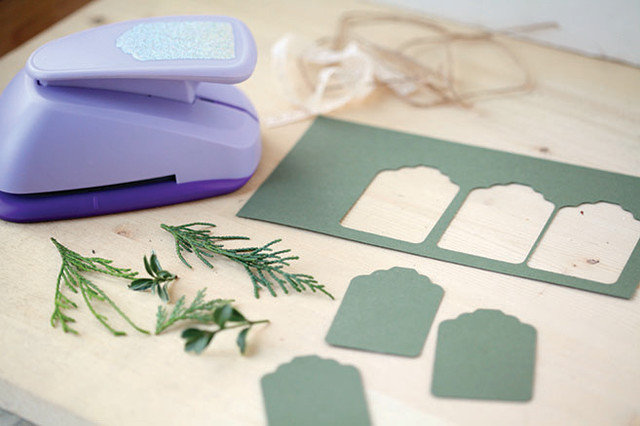
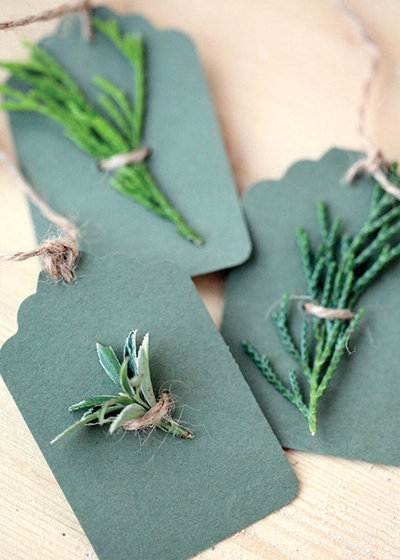
Evergreen Gift Tags
By adding evergreens to the garden, you are sure to have more than just a patch of dirt in the winter months. The evergreens in my garden provide yearlong supplies for crafts and garden projects, like these gift tags. Snipping a leaf from right outside your door makes an easy decoration and it adds a little life to your holiday gifts.
By adding evergreens to the garden, you are sure to have more than just a patch of dirt in the winter months. The evergreens in my garden provide yearlong supplies for crafts and garden projects, like these gift tags. Snipping a leaf from right outside your door makes an easy decoration and it adds a little life to your holiday gifts.
- Evergreen clippings
- Card stock
- Craft punch or scissors
- Jute twine
- Small hole punch or sharp skewer
2. Use a craft punch to cut out the tag shape from the card stock. If you don’t have a tag punch, then simply cut out a tag shape with scissors.
3. Using a small hole punch or a sharp skewer, make a hole in the top of the tag and two holes (side by side horizontally) in the center a half inch apart.
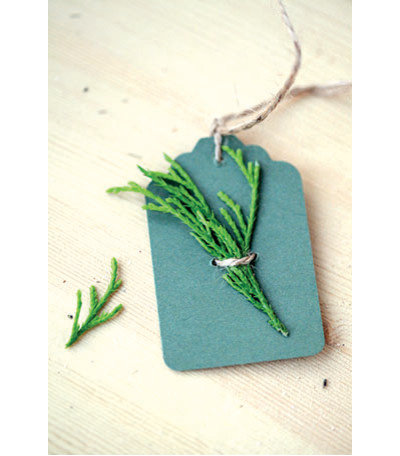
4. Thread both ends of a piece of jute twine through to the back of the tag from the two holes in the middle. Thread one end of the twine through the top hole from back to front.
5. Insert the evergreen leaf into the loop created by the jute twine and the two center holes.
4. Thread both ends of a piece of jute twine through to the back of the tag from the two holes in the middle. Thread one end of the twine through the top hole from back to front.
5. Insert the evergreen leaf into the loop created by the jute twine and the two center holes.
6. Pull both ends of the twine to tighten and hold the leaf. Tie the two ends together around the top hole and your tag is ready to attach.
These DIY projects are excerpted from Stephanie Rose’s Garden Made by arrangement with Roost Books, an imprint of Shambhala Publications.
More
Holiday DIY: Handmade Ring Holder and Pompom-Embellished Stocking
DIY Project: How to Make a ‘Kokedama’ String Garden
More
Holiday DIY: Handmade Ring Holder and Pompom-Embellished Stocking
DIY Project: How to Make a ‘Kokedama’ String Garden
Похожие статьи

Статья практикующего дизайнера
Пошаговое руководство: Как выбрать своего дизайнера интерьера
Автор: Natalia Mitina
Практикующий дизайнер описывает методику поиска автора вашего будущего проекта
Читать

Советы по декору
Вопрос: Как определить, какого размера ковер вам нужен
Автор: Ольга Божко
Перед тем как завести ковер или расположить уже имеющийся — повторим несколько правил
Читать

Статьи о кухнях
Что лучше: Матовый или глянцевый фасад для кухни
Автор: Евгения Назарова
Как отметил один из дизайнеров, вопрос уровня «брюки или юбка». И все же
Читать
Статьи про наведение порядка
Все запущено: Как навести порядок в квартире и начать новую жизнь
Автор: Юлия Володина
Мы за интеллектуальный подход к уборке, потому составляем план действий, чтобы разобрать домашние завалы
Читать

Советы для маленьких комнат
Скромные метры: 12 мест для хранения, которые вы зря игнорировали
Автор: Юлия Девятова
Используйте каждый квадратный сантиметр с пользой — изучите наши идеи для хранения
Читать
Почему не мне
Почему не мне это пришло в голову: 17 идей в закладки
Автор: houzzrussia
Так тоже можно! Сохраните в закладки, вдруг пригодится
Читать

Статья практикующего дизайнера
Эргономика: Как правильно вешать светильники
Автор: Наталья Преображенская
Важно всё: высота относительно пола, потолка, уровня глаз. И даже габариты мебели в комнате
Читать

Статьи про наведение порядка
Где сушить белье в квартире... красиво
Автор: Екатерина Кулиничева
Если не хочется развешивать его над ванной и ставить сушилку посреди гостиной. А балкона — нет
Читать
Советы по ремонту
Как выбирать строителей: 11 советов от дизайнера интерьеров
Автор: Дарья Харитонова
Чтобы ремонт не превратился в кошмар, выберите правильного подрядчика
Читать

Статьи о кухнях
Дизайн-дебаты: Надо ли планировать кухню по рабочему треугольнику
Автор: Татьяна Гронская
Правило рабочего треугольника помогает экономить силы и время на кухне. Но часто ли применяют это правило на практике?
Читать